Quick Start
Welcome to the BIC Process Design help.
First steps
Welcome Screen
After successful login, you will be redirected to your welcome screen.
If your user role is administrator, editor or author your welcome screen will look like the following.

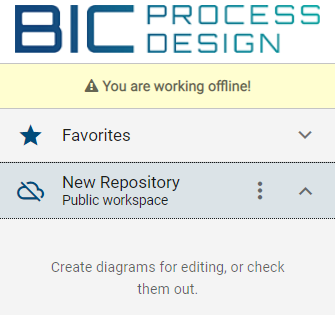
The welcome screen consists of different elements.
(1): In the left sidebar, you can find your favorite diagrams, as well as the categories and diagrams of the currently opened repository.
(2): In the menu bar at the top you can access many useful functions such as the administration and the global search.
(3): In the center of the application, you can create a new diagram. If your role is reader or reviewer, you will see the MyBIC-Site here, which presents you useful diagrams and search results.
(4): With the button NEW USER INTERFACE - WORK IN PROGRESS you can switch to the new user interface of BIC Process Design.
(5): Here you got access to your profile. You can change your role or activate the high contrast theme. Furthermore, here is the possibility to sign out.
You can always return to your welcome screen by clicking on the logo at the top left of the screen or the repository name.
Note
After successful login you will be informed about a software update and new features of BIC Process Design if applicable.
Warning
Do not log in to the system with the same workspace and the same browser and different credentials. This type of operation can lead to inconsistencies and data loss in the worst case. It is not supported by the software.
How do I sign in?
As soon as you are registered as a user in BIC Process Design, you will receive an e-mail with a link to set your password. The link is valid for 24 hours. Open this link and set a password.
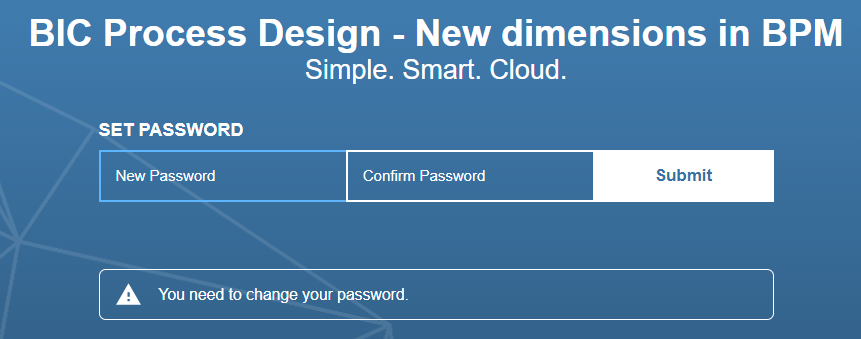
Confirm the password via Submit.
You will be informed that the registration was successful. Furthermore a link will appear which you can open to go directly to the login page.
When you have registered once, you can always log in to your BIC Process Design by entering your e-mail address and the password on the login page.

After successful login you will be directed to your Welcome screen. Eventually, you will be informed about a software update and new features of BIC Process Design.
Warning
Do not log in to the system at the same workstation and the same browser and different credentials (without clearing the cache). This type of operation can lead to inconsistencies and data loss in the worst case. It is not supported by the software.
As an SSO user, you are directly logged in to BIC Process Design by opening the application if you are logged in to you SSO-system. The login page of the application is no longer usable. Your login data are managed by the SSO-system and you do not receive any e-mails with links to set your password from BIC Process Design. Therefore, you can only change your password in the external system. In addition to SSO users, “normal” users can have access to the application and the login page in the same tenant using the corresponding URL parameter.
How is the login lock configured?
If you make ten consecutive failed login attempts, the account will be locked for one minute. During this lockout period, each login attempt will receive the message Invalid username or password. If further failed login attempts are made after the lockout period has expired, the waiting time until the next attempt will be incrementally increased, with a maximum waiting time of up to fifteen minutes.
The login attempt counter is reset every twelve hours or after a successful login. In addition, a one-minute lockout occurs if the time between two consecutive failed login attempts is one second or less.
How do I sign out?
We recommend you to sign out after finishing your work with BIC Process Design.
Press the Profile button to the right of your user name.

There click on the upper Logout button.
If you have checked out diagrams, you will be notified with a dialog. Please keep in mind that local workstations are stored in the “Local Storage” of your browser. According to your browser settings, it is thus possible that local workstations are rejected by closing the browser. Therefore, always check in your changes to unlock the diagram for further processing. Subsequently you are logged out and are forwarded to the logout page of BIC Process Design.
During your next login, BIC Process Design will redirect you to the repository you have worked in last.
Note
If you are inactive for at least 30 minutes by default, your session will expire. You will be logged out and asked to log in again.
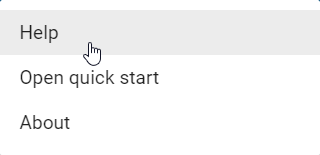
Where can I find the help?
A click on the question mark in the upper menu bar opens a menu. Here you can choose to view the user documentation in a new browser tab by a click on help. If you click on Open quick start, this chapter of the documentation will open.

How can I switch to the new user interface?
On your welcome screen and on your “MyBIC” page, you can find the button NEW USER INTERFACE - WORK IN PROGRESS in the menu bar. Clicking on it will take you directly to the MyBIC page in the new interface.
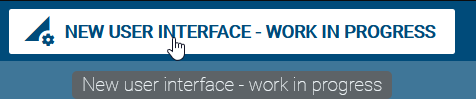
Similarly, you can return to the old user interface from the new one using the button in the header.
Note
If you use Internet Explorer as your browser, you cannot change the user interface because the new interface is not available here.
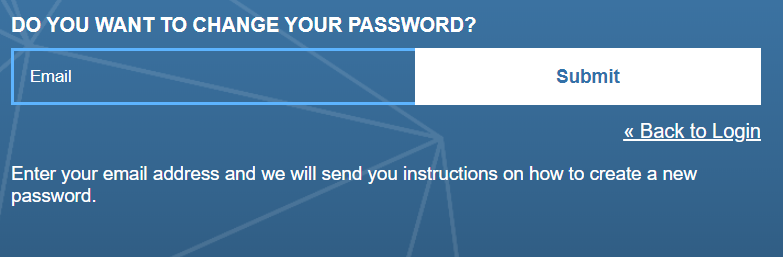
How do I change my password?
You can change your password on the login screen. Log out if you are already logged in. If you have forgotten your password, you can also reset it by following the steps. To do this, click on Change password on the login page.
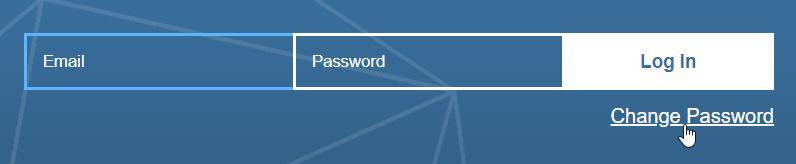
You can then enter your registered e-mail address and click Submit.
You will receive an e-mail with a link to set your new password. The link is valid for 5 minutes. Follow this link to the corresponding page where you can enter your new password.
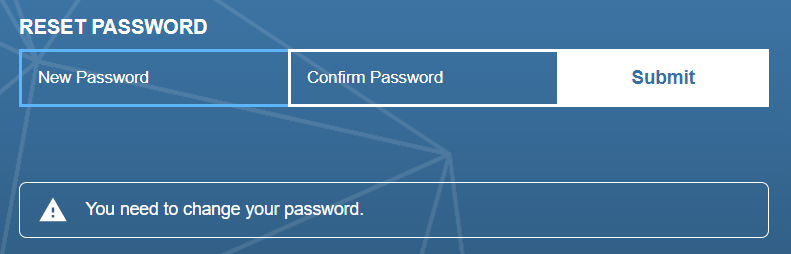
Confirm your input by clicking on Submit. Your new password will be saved and you will be redirected to the welcome screen.
Alternatively, administrators can send a link to change the password to every user.
Note
Your password must be at least twelve characters long, contain one number, one special character, one lowercase and one uppercase.
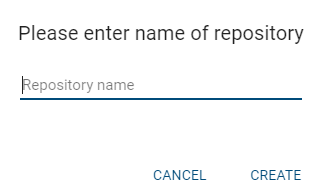
How do I create a repository?
Open the context menu by clicking the context menu-button in the explorer.
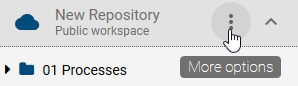
In the context menu, select New Repository. An input field appears. Enter the name of the new repository.
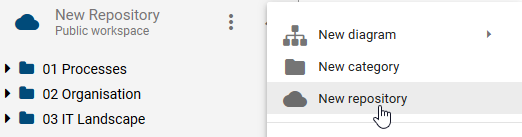
Confirm your input by clicking Create.
Note
Note that you can only create repositories if you are in the administrator user role.
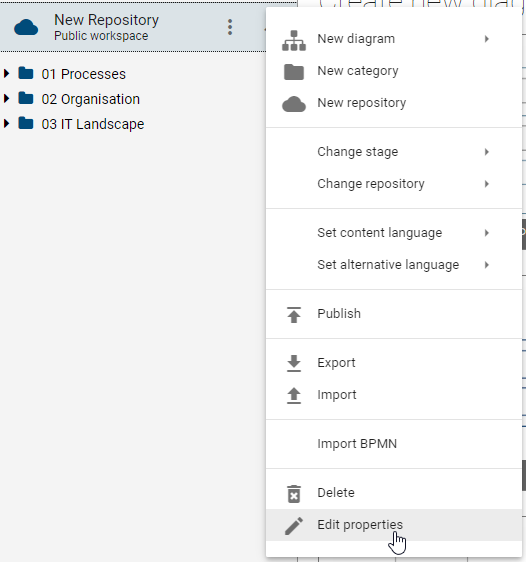
How do I rename a repository?
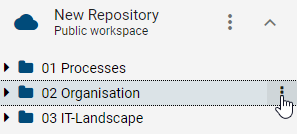
In the explorer, open the context menu by clicking on the context menu-button (visualised by three points).
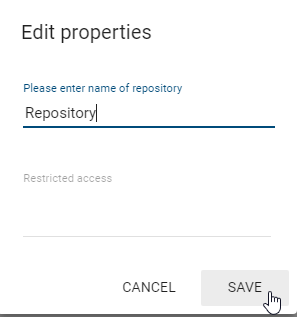
Select Edit properties from the context menu.
An input field Please enter name of the repository appears where you can change the name of the repository. Confirm by clicking Save.
Note
Note that you can only rename repositories if you are in the administrator user role.
How can I view different repositories?
If you are working with several repositories, you can switch between them in the explorer, because just one repository is displayed in the explorer at a time.
To display another repository, click the context menu button of the current repository. There click on Change Repository. An alphabetically sorted list of available repositories opens. If necessary, scroll until the desired repository is displayed. Alternatively, you can enter the name of the repository in the Filter input field, which is at the top of the list, and search for your entry using the Enter key.
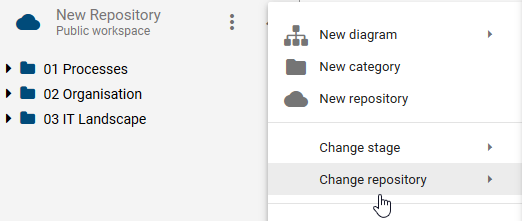
Select the desired repository by clicking its name. The selected repository is now displayed in the explorer.
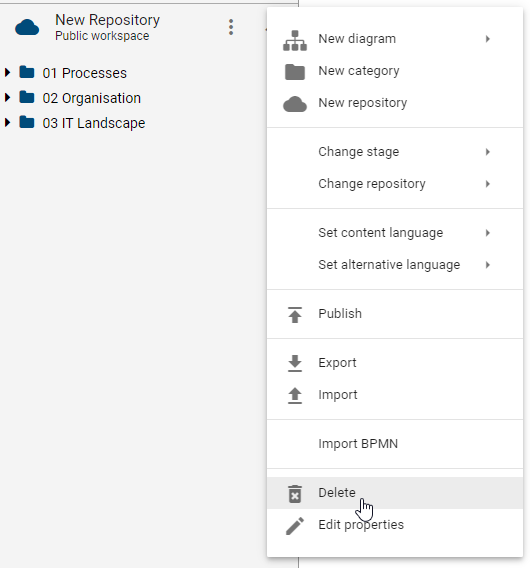
How do I delete a repository?
Select the repository you want to delete. Now open the context menu in the explorer by clicking the context menu-button. There select Delete. A dialog appears to confirm the deletion of the repository. Confirm with Delete to delete the repository.
Note
Deleting a repository deletes all diagrams inside in the repository, as well as the catalog, and thus has extensive consequences. Note that you can only delete repositories if you have administrator rights.
How do I create a category?
Categories are helpful to structure logically related elements. You can create categories within a repository and add more categories within a category. Categories are sorted alphabetically within a level.
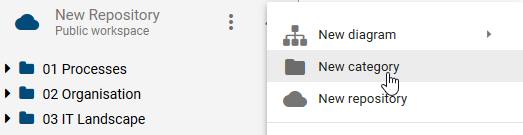
Open the context menu for the repository or a category by using the context menu button.
Select the entry New Category.
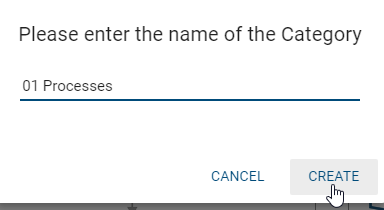
Enter the desired name for the category. Close the input dialog by clicking Create or the Return-key.
The new category is now visible in the explorer, either at the repository level (if you have created a new category from the context menu of the repository) or below the selected category (if you have created the new category from the context menu of an existing category).
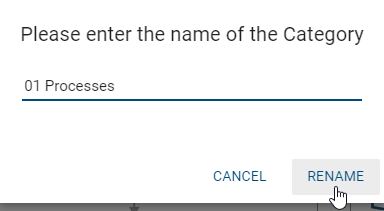
How to rename a category?
Click the context menu-button on the right of the category name to open the context menu for the category.
Click the Rename entry to rename the category.

Edit the name of the category. The category is renamed directly after confirmation.
How do I delete a category?
Categories can include diagrams and subordinate categories with additional diagrams. When you delete a category, all the diagrams and categories associated with the category are also deleted.
Navigate over the explorer to the category that you wish to delete and open the context menu of the category. There select the Delete entry.

A dialog warns you that your category will be deleted. Confirm the dialog to delete the category.
Note
If necessary, create a backup beforehand to avoid the loss of important data. If a locked diagram is part of the category, the category can not be deleted.
My first diagram
You can create new diagrams of different types. Initially, newly created diagrams are not checked in, meaning they are only available in your local workspace. To make a diagram available in the public workspace, you have to check it in.
To edit existing diagrams in the public workspace, they have to be checked out before. After you have checked out a diagram, you can edit it. It is then locked for other users. Checked out diagrams are also available without active internet connection.
After completing the editing, you have to check in the diagram again. After check-in, other users can see the changes and continue to work on the diagram. Checked in diagrams can also be published.
The interface of BIC Process Design
The screen of BIC Process Design stores different functionalities and views. It is divided into three areas.
Explorer: On the left side you can see the Explorer in which your repository and the created categories and diagrams are displayed.
Editor: The Editor represents your working area in which you can model and edit your diagrams as well as the necessary symbol palette.
Menu bar: The upper area of your screen displays further functionalities that you can use to model and to display different views of a diagram or the option to switch to the catalog.
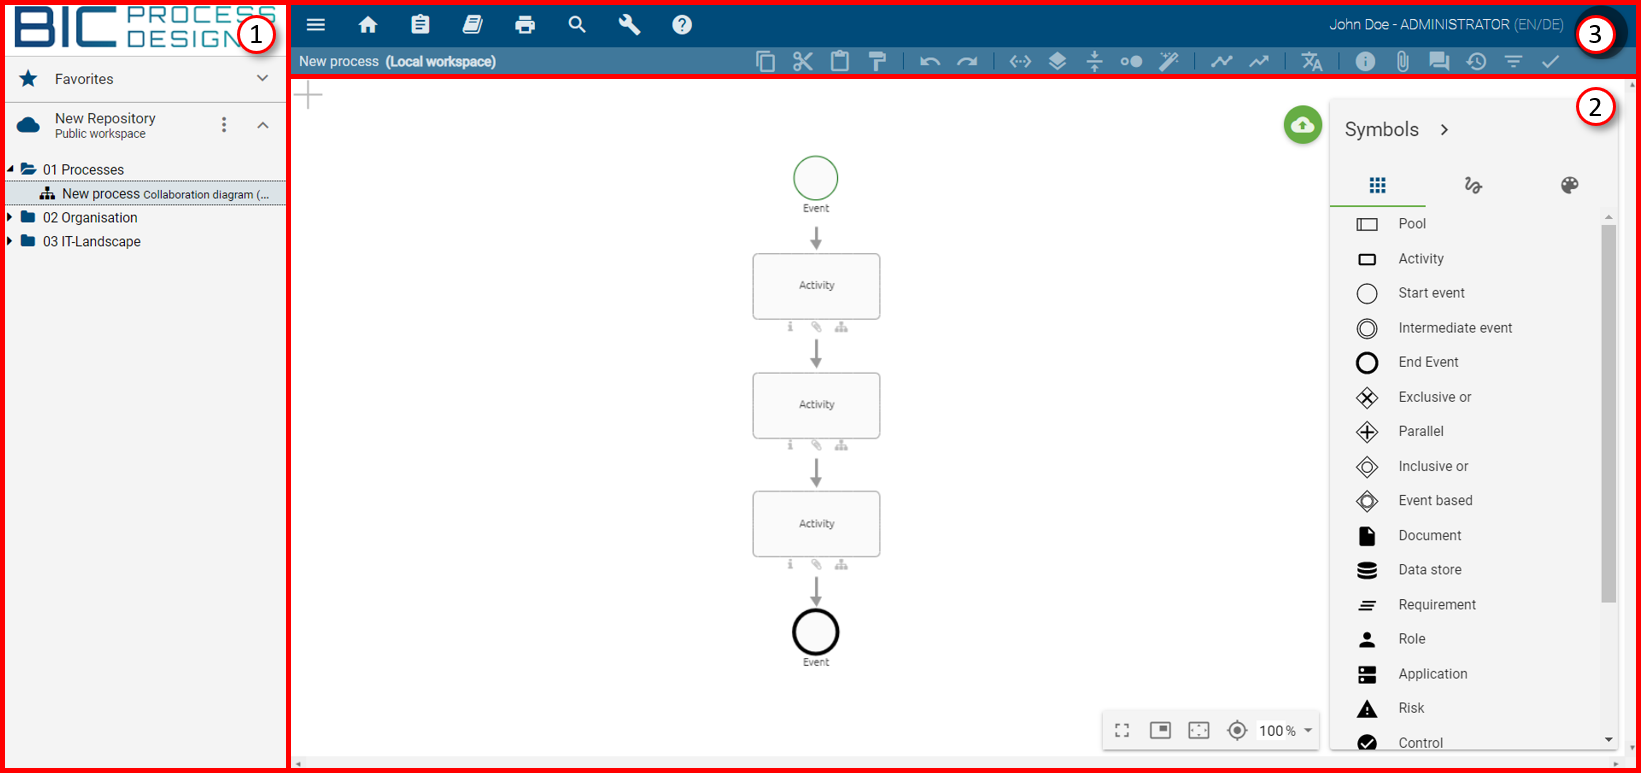
Figure: The interface of BIC Process Design is divided into Explorer (1), Editor (2) and Menu bar (3).
Note
The symbol palette and parts of the menu bar and are only visible when a diagram is selected by modeling.
How do I create a diagram?
You can create a new diagram when you at least have the rights of an editor. Existing diagrams are displayed in the tree structure of the explorer and can be on repository level or nested in a category. Within a level, diagrams are listed below existing categories and sorted alphabetically.
Use the tree structure of the explorer to navigate to the level where you want to create a new diagram. There open the context menu of the desired repository or category.
In the context menu, navigate to the New diagram entry. Then click on the entry to open a list of available diagram types.
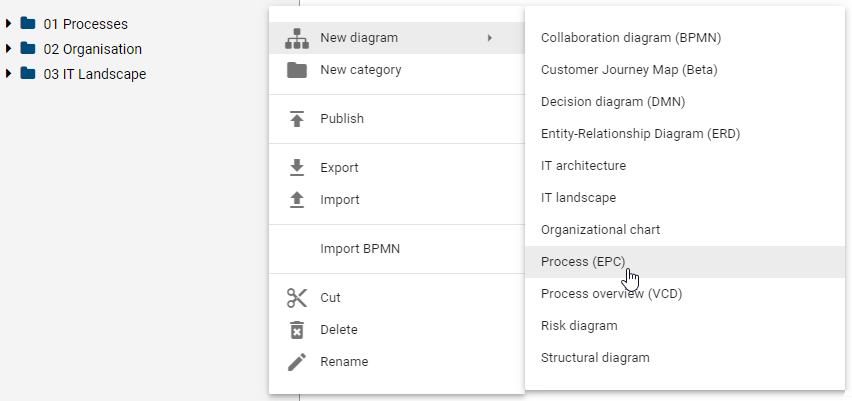
Select the desired diagram type. An input dialog will appear where you can name the diagram.
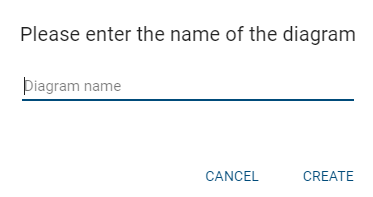
Close the dialog by pressing the Return-key or by clicking Create.
After the new diagram has been created and named, it appears in the explorer and the symbol palette appears with the corresponding modeling objects in the editor. You can now start to model your diagram.
Note
You can also create new diagrams directly from the welcome screen by choosing one of the available diagram types.
How do I save changes to a diagram?
In the opened diagram, you will find the circular Save-button in the upper right-hand side of the editing window. If there are any changes that are not saved, the button appears.

Click the Save-button. Your changes will be saved in the local storage of your browser. Keep in mind, that by saving, diagrams are not automatically available in the public workspace. This is possible if your diagram gets checked-in.
Note
If you are editing diagrams and have not saved them yet, you will be asked if you want to save the diagrams when you exit the Internet Explorer or when you log out (Internet Explorer and Chrome). Saving without check-in locks the diagram to other users and may imply data loss. According to your browser settings, local workstations may be discarded when the browser is closed. Please always check-in local changes.
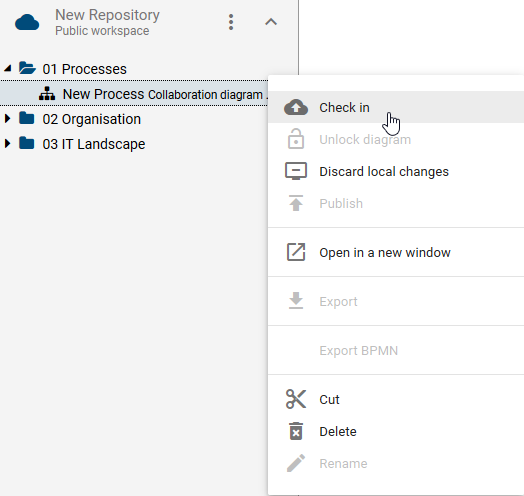
How do I check-in a diagram?
Checked out diagrams should be checked in after editing and saving them. This is how changes will be made available for other users who have access to the public workspace.
You will see the check-in-button in the editor on the upper right-hand side. Click this button to make the diagram available for online usage.

Note
If you have not maintained an author in the attributes of the diagram, you will get a notification while checking in that users of the Author role can not edit the diagram anymore.
The diagram is now checked in. To edit it, you need to check it out again.
Optionally, you can click on the context menu-button right of the diagram name and select the Check In entry.
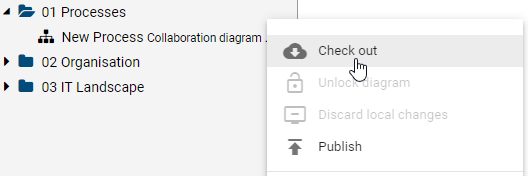
How do I edit / check out diagrams?
Only a checked out diagram can be edited. This locks the diagram for other users and is preventing parallel processing of a diagram.
Open the diagram and you can see the Edit-Button in the upper right-hand side corner of the editor. Click on this button to edit the diagram and to make it available for offline use.

You can now edit the checked out diagram.
Optionally, you can click on the context menu-button right of the diagram name and select the Check Out entry.
How to rename a diagram?
You can rename a diagram if you have the rights of the user role Author and you are entered as author in the diagram attributes.
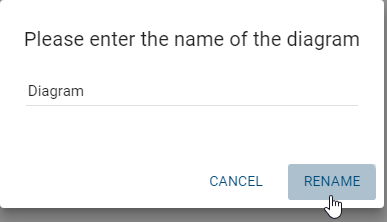
In Explorer, navigate to the diagram you want to rename and open the context menu. Select Rename and enter the desired name in the appearing dialog.
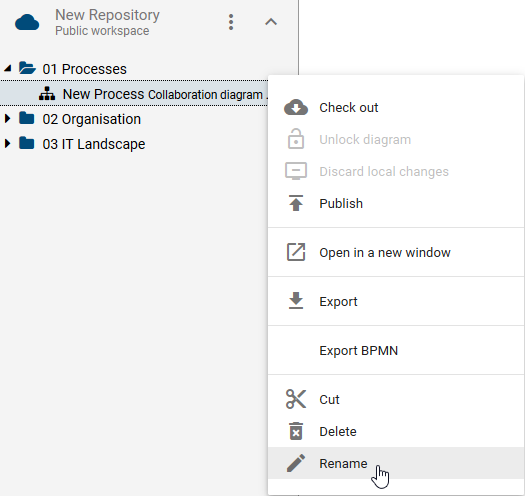
Click on Rename to apply your changes.
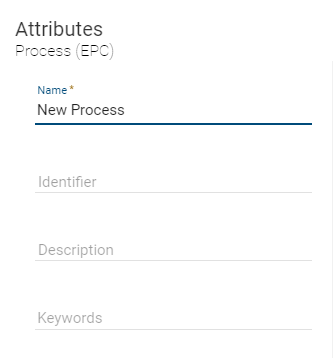
Optionally you can rename a diagram in attribute Name via the attribute tab. To do that, check out the diagram, rename it and check in your changes.
Note
A locked diagram, that is checked out by another user, can not be renamed.
How to work offline on diagrams?
Our innovative technology allows you to work in BIC Process Design even if you do not have an active network connection. Log in with an active internet connection. If the connection is lost, you can still use the application offline. You’ll be notified that you are working offline, and in addition, the cloud icon in front of your repository is crossed out. Depending on the browser settings, the offline function will continue to exist after closing and opening the application in the browser. In offline mode, you can create new diagrams and edit checked-out diagrams. Only when an internet connection is detected, all functions are again available as usual. In case a new software version is available, an update dialog will automatically inform you about that.
Check-out: You have to check out the intended diagram to edit it offline.
Edit: Your changes are saved locally within the browser and synchronized with the BIC Process Design Server as soon as you are working with an active network connection again.
Check-in: Check in the diagram to allow other users to edit it.
Note
If you’ve checked out a diagram for offline editing, this diagram will be locked for all other users until check in. Furthermore, the offline mode is not available in the Internet Explorer and after logging out.
How can I view my checked out diagrams?
You can display all locally available. These are all diagrams that you have checked out but not checked in again.
Open the context menu of the repository and click the Change stage entry. Afterwards choose Local Workspace to see all your local diagrams.
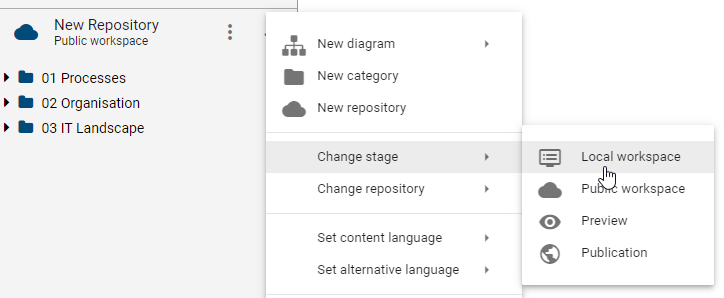
Open the context menu of the repository and choose Public Workspace to display all public diagrams or elements again.
How do I cancel the editing of diagrams?
If you changed a diagram, but you don’t want to check in these changes and transfer them to the local workspace, you have the following options to discard the changes:
Open the context menu of the corresponding diagram and select the entry Discard local changes.
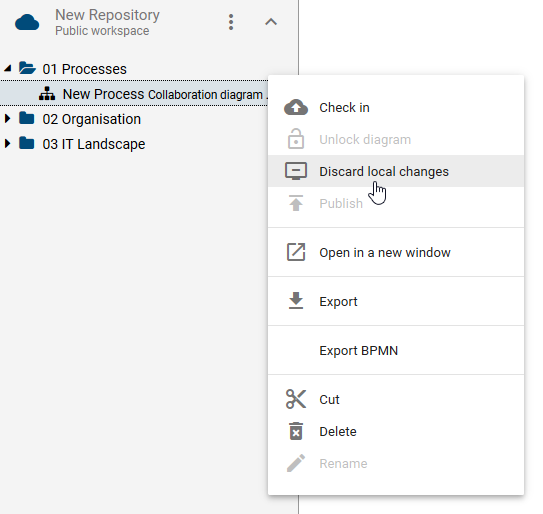
Confirm the subsequent query. Your changes will be irrevocably deleted. The diagram is now unlocked to other users.
How do I delete a diagram?
You can delete diagrams from the public workspace by applying the following steps:
Make sure you are in the Public Workspace. Open the context menu of the diagram which you want to delete. Here select the Delete entry.

A dialog warns you that your diagram is irrevocably deleted.
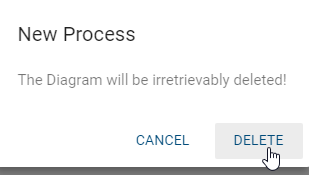
Confirm the dialog by clicking on Delete or pressing Enter.
The diagram versions in the publication and in the preview remain.
Note
If necessary, create a backup beforehand to avoid the loss of important data, using the export for example. You will receive an e-mail if one of your favorite diagrams of the public workspace is deleted. Locked diagrams cannot be deleted.